728x90
"""
#디렉토리구조
project_root/
│
├── images/
│ └── example_image.png # 분석할 이미지 파일들
│
├── embeddings/
│ └── vector_store.index # 생성된 벡터 스토어를 저장할 위치 (선택사항)
│
├── main.py # 주요 Python 코드 파일
│
├── requirements.txt # 필요한 라이브러리 목록 (선택사항)
│
└── README.md # 프로젝트 설명 파일 (선택사항)
"""
"""
#requirements.txt
pytesseract
pillow
faiss-cpu
sentence-transformers
"""
"""
#operation
pip install -r requirements.txt
python main.py
"""
"""
#setup to windows
"""
import pytesseract
from PIL import Image
from sentence_transformers import SentenceTransformer
import faiss
import numpy as np
# Tesseract 실행 파일 경로 설정 (Windows)
pytesseract.pytesseract.tesseract_cmd = r'D:\Program Files\Tesseract-OCR\tesseract.exe'
# 1. 이미지에서 텍스트 추출 (OCR)
def extract_text_from_image(image_path):
"""
이미지 경로에서 이미지를 열어 Tesseract를 사용해 텍스트를 추출하는 함수.
매개변수:
image_path (str): 이미지 파일의 경로
반환값:
text (str): 이미지에서 추출된 텍스트 문자열
예시:
이미지에 "Hello World"라는 텍스트가 있을 경우, 이 함수는 "Hello World" 문자열을 반환합니다.
"""
image = Image.open(image_path)
text = pytesseract.image_to_string(image, lang='eng') # 'eng' 대신 원하는 언어 코드 사용 가능
return text
# 2. 텍스트 임베딩 생성
def generate_text_embedding(text):
"""
텍스트를 벡터(임베딩)로 변환하는 함수.
매개변수:
text (str): 벡터화할 텍스트 문자열
반환값:
embedding (numpy.ndarray): 텍스트에 해당하는 벡터(임베딩)
예시:
"Hello World"라는 텍스트는 384차원 벡터로 변환됩니다.
"""
model = SentenceTransformer('paraphrase-MiniLM-L6-v2') # 임베딩 생성 모델
embedding = model.encode([text]) # 텍스트를 벡터로 변환
return embedding
# 3. 벡터 스토어 구축 및 저장
def build_vector_store(embeddings):
"""
텍스트 임베딩을 받아 FAISS 인덱스를 생성하고 벡터 스토어에 저장하는 함수.
매개변수:
embeddings (numpy.ndarray): 저장할 텍스트 임베딩(벡터)의 배열
반환값:
index (faiss.IndexFlatL2): FAISS 인덱스 객체
예시:
여러 텍스트 임베딩을 받아 이들을 저장하고 검색할 수 있는 벡터 스토어를 생성합니다.
"""
dim = embeddings.shape[1] # 벡터의 차원
index = faiss.IndexFlatL2(dim) # L2 거리 기반 인덱스 생성
index.add(embeddings) # 벡터 스토어에 임베딩 추가
return index
# 4. 검색 함수
def search_similar_texts(query_embedding, index, top_k=5):
"""
벡터 스토어에서 가장 유사한 텍스트를 검색하는 함수.
매개변수:
query_embedding (numpy.ndarray): 검색할 쿼리 텍스트의 임베딩 벡터
index (faiss.IndexFlatL2): 벡터 스토어에서 검색할 FAISS 인덱스
top_k (int): 검색할 가장 유사한 텍스트의 개수 (기본값: 5)
반환값:
distances (numpy.ndarray): 검색된 텍스트와 쿼리 텍스트 간의 거리 값
indices (numpy.ndarray): 검색된 텍스트의 인덱스
예시:
특정 텍스트와 가장 유사한 텍스트를 검색하고 그 인덱스와 유사도 거리를 반환합니다.
"""
distances, indices = index.search(query_embedding, top_k) # top_k개 유사한 텍스트 검색
return distances, indices
# 5. 이미지에서 텍스트 추출 및 벡터 스토어 구축
image_path = 'images/example_image.png' # 분석할 이미지 경로
text = extract_text_from_image(image_path) # 이미지에서 텍스트 추출
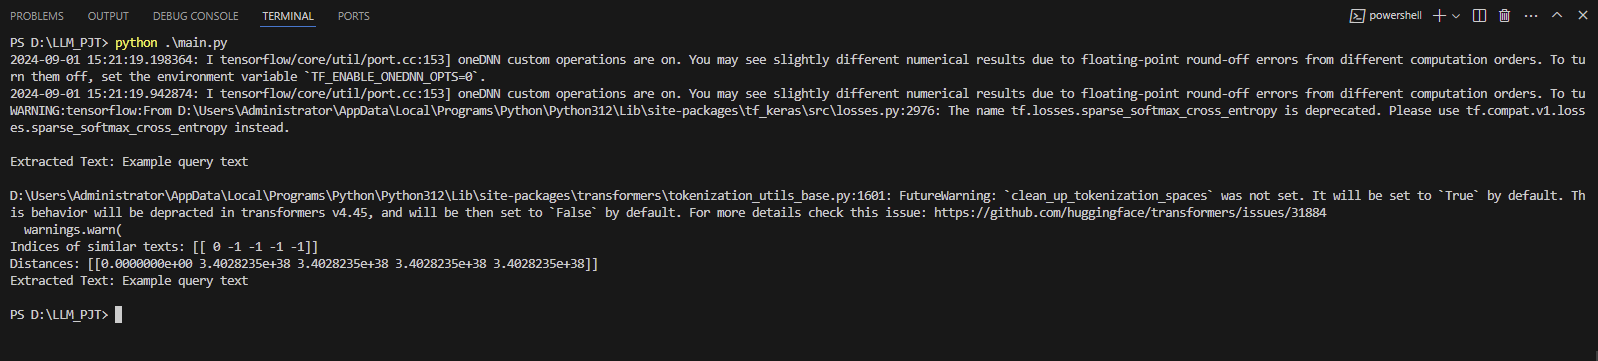
print("Extracted Text:", text) # 추출된 텍스트 출력
embedding = generate_text_embedding(text) # 추출된 텍스트를 임베딩으로 변환
# 6. 단일 텍스트 임베딩을 벡터 스토어에 추가 (여러 텍스트가 있다면 반복 가능)
vector_store = build_vector_store(embedding) # 벡터 스토어에 임베딩 추가
# 7. 검색 테스트
query_text = "Example query text" # 검색할 쿼리 텍스트
query_embedding = generate_text_embedding(query_text) # 쿼리 텍스트를 임베딩으로 변환
distances, indices = search_similar_texts(query_embedding, vector_store) # 유사 텍스트 검색
# 8. 검색 결과 출력
print(f"Indices of similar texts: {indices}")
print(f"Distances: {distances}")
text = pytesseract.image_to_string(Image.open(image_path))
# OCR 결과 출력
print("Extracted Text:", text)
728x90
'AI(Artificial Intelligence)' 카테고리의 다른 글
| python character recognition (2) | 2024.08.28 |
|---|---|
| classification - adagrad + dropout ( 분류 - 아다그라드 + 드랍아웃 ) (0) | 2024.08.21 |
| classification - GSD + dropout ( 분류 - 확률적 경사하강법 + 드랍아웃 ) (0) | 2024.08.21 |
| classification - adagrad ( 분류 - 아다그라드 ) (0) | 2024.08.21 |
| classification - Stochastic Gradient Descent (분류 - 확률적경사하강법) (0) | 2024.08.21 |


